Arrange
The main view: the whole song, one MIDI channel per row. Each channel holds one or more parts, the colored blocks with a thumbnail of their notes. Here you move, copy and cut the music in blocks, and work on the range between the L and R locators.
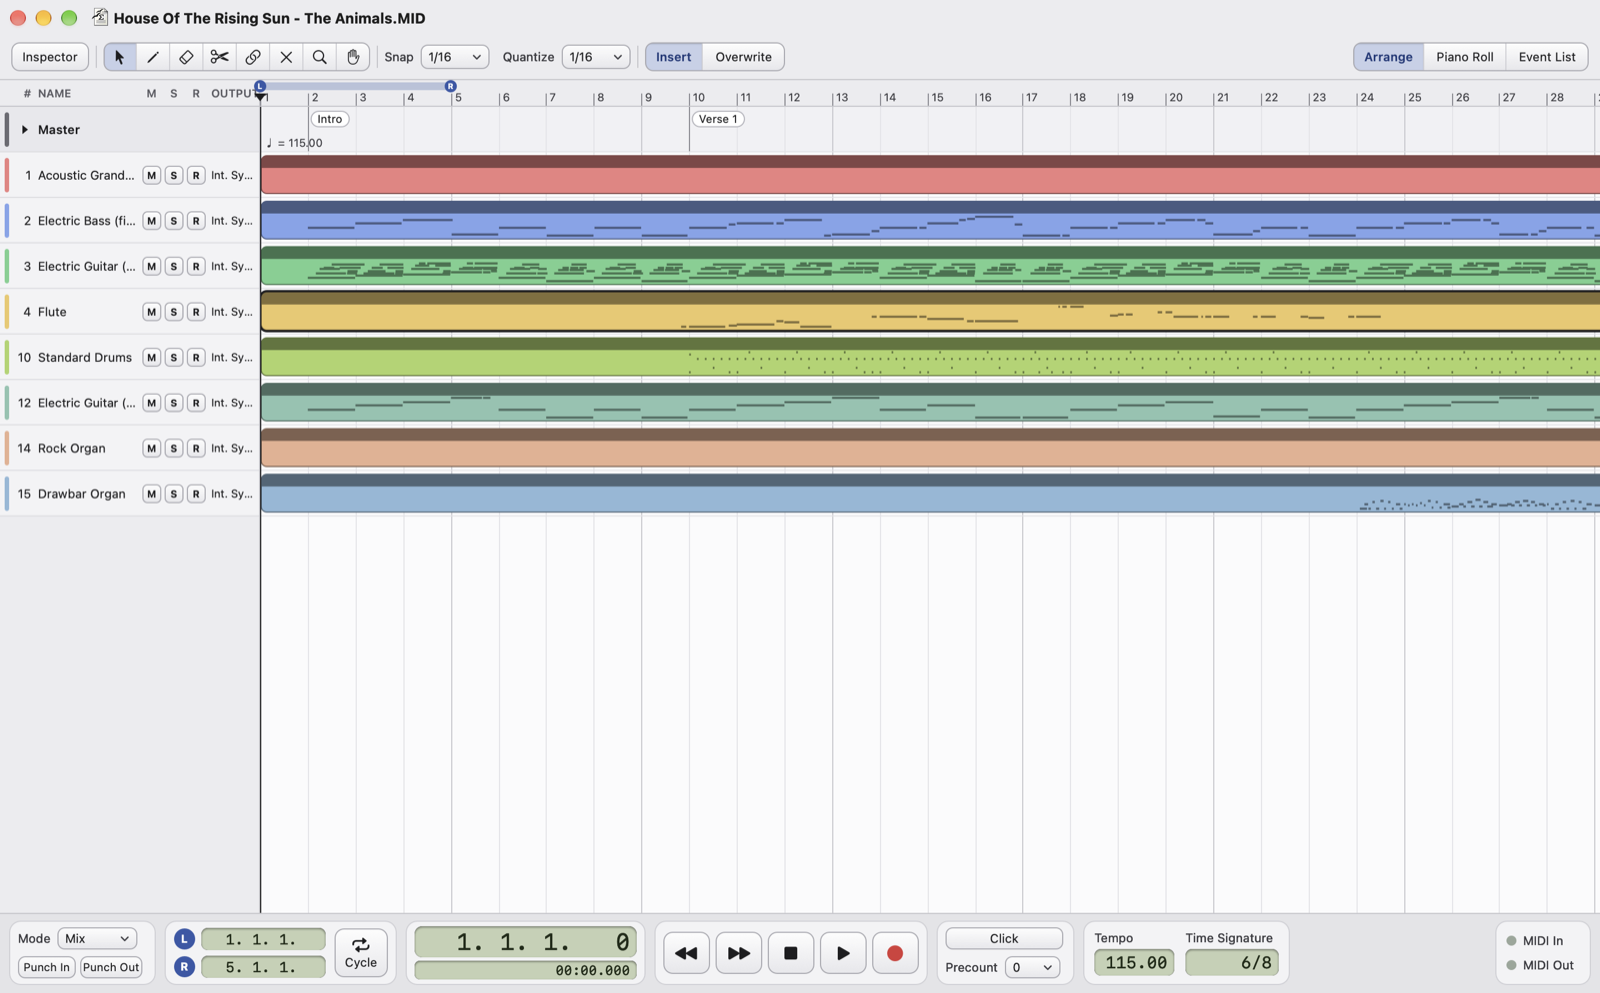
- Master rowThe "conductor" track of the song: tempo, time signature, key, markers, lyrics and chords, SysEx and texts such as title and copyright. The triangle opens the tempo track, where tempo changes are drawn and moved with the mouse.
- ChannelsThe channel number (1–16), its name and the instrument: the General MIDI name of the first Program Change; on channel 10 the drum kit. Click to select a channel, ⌘-click to add more; the Master row can be selected too. Only the channels in use are shown: to see all of them use View › Show Only Used Channels.
- M, S, RM (mute) silences the channel, S (solo) plays only the soloed channels, R arms it for recording: one channel at a time receives what you play.
- OutputWhere the channel plays: the built-in synthesizer or a MIDI output, such as a sound module. Change it in the Inspector; Transport › Output for All Channels changes them all at once.
- Ruler and locatorsClick to move the position; ⌘-click sets the L locator, ⌥-click the R locator; drag to set L and R together. The band between L and R is the range used by cycle, recording and the operations between the locators.
- Markers and tempoThe markers of the song in the Master row (here Intro and Verse 1) and the starting tempo.
- Selected partA selected part has a dark border. Double-click it to open it in the Piano Roll (in the Drum Editor on channel 10).
Working with parts
When you open a MIDI file each channel becomes a single part as long as the song. You then split parts with the scissors or with the locators. Parts on the same channel never overlap: a part moved or stretched over another one cuts what it covers.
- Move: drag the part, even to another channel (the notes take the channel of the new row). Moving follows the Snap setting in the toolbar.
- Copy: drag while holding ⌥.
- Resize: drag the left or right edge. Notes left outside are not deleted: they don't play, and they come back if you lengthen the part again.
- Split: click with the scissors. A note across the split stays whole in the left part.
- Glue: click a part with the glue to join it to the following one.
- Draw: drag with the pencil in an empty area to create a new part.
- Mute and delete: with the mute tool, with the eraser, or with the ⌫ key on the selected parts.
- Name and color: right-click a part for Rename…, Color, Channel Color, Mute and Delete.
Choose the tools in the toolbar or with the keys 1 to 8: arrow, pencil, eraser, scissors, glue, mute, magnifier and hand.
Operations between the locators
They work on the range between L and R of the selected channels; with no channel selected, on the whole song, Master included. What happens depends on the Insert / Overwrite switch in the toolbar:
| Command | Insert | Overwrite |
|---|---|---|
| Cut (⌘X) | removes the range and closes the gap: what follows moves back | removes the range and leaves it empty |
| Copy (⌘C) | copies the range to the clipboard, shared by all open songs | |
| Paste (⌘V) | at the current position: opens space and moves the rest forward | replaces what is there, for the same length |
| Insert Silence (⇧⌘I) | opens an empty space from L to R | — |
| Delete Between Locators (⌘⌫) | like Cut, without the clipboard | removes the events and leaves the range empty |
| Repeat… (⌘D) | inserts the copies after R | overwrites after R |
Notes across L or R are cut at the edge; with Edit › Keep Whole Notes That Start Inside they stay whole. In Insert mode on the Master row tempo and time signature move too, so the music stays in time.
Zoom
⌘+ and ⌘- zoom in and out horizontally; ⌥⌘+ and ⌥⌘- make the rows taller or shorter, with thicker notes in the thumbnails. With the magnifier: click zooms in, ⌥-click zooms out, with ⇧ vertically.